
Fastlane - Screenshots
fastlane - screenshots 기능을 사용할 때는 일반 클래스에 하는 것이 아니라 UI Test Target을 하나 생성하여 진행해야 합니다
이번 기회에 UI Test도 한번 해보겠네요
아무튼 docs는 여기 있습니다
https://docs.fastlane.tools/getting-started/ios/screenshots/
시간이 꽤 지나긴 했지만 2017년에 만들어진 한국어 영상이 있으니 참고해도 좋을 것 같습니다
FastLane Snapshot으로 배포용 스크린샷 자동으로 만들기 - iOS Tech Talk
https://hcn1519.github.io/articles/2017-03/iOS_fastlane_snapshot
Setting Up snapshot
-
Create a new UI Test target in your Xcode project (See the top part of this article)
프로젝트에서 UI Test target 을 새로 생성합니다메뉴 > File > Target > iOS UI Testing Bundle을 선택하면 됩니다 -
Run
fastlane snapshot initin your project folder
그리고 해당 프로젝트 폴더에서 위 명령어를 입력합니다
그러면 snapshot을 만들 수 있도록 fastlane 설정을 해줄거에요! -
Add the
./SnapshotHelper.swiftfile to your UI Test target (You can move the file anywhere you want)
init이 완료되면 해당 폴더의.fastlane/SnapshotHelper.swift파일을 UI Test target에 추가해줍니다
아래와 같은 코드를 작성해볼게요
    class FastlaneTestUITests: XCTestCase {

        override func setUp() {
            continueAfterFailure = false

            let app = XCUIApplication()
            setupSnapshot(app)
            app.launch()
        }

        func testScreenshots() {
            // 스크린샷을 찍은 snapshot() 함수를 호출합니다
            snapshot("0Launch")
        }
    }
작성 후 터미널에서 fastlane snapshot 명령어를 실행합니다
Snapshot 을 찍기 위한 설정 코드는 ./fastlane/Snapfile 에 작성되어 있는데요 아래와 같은 모습을 가집니다
원하는 디바이스, 언어를 작성하여 내 프로젝트에 필요한 스크린샷만 뽑아 낼 수 있습니다
    # A list of devices you want to take the screenshots from
    # devices([
    #   "iPhone 6",
    #   "iPhone 6 Plus",
    #   "iPhone 5",
    #   "iPhone 4s",
    #   "iPad Retina",
    #   "iPad Pro"
    # ])

    languages([
      "en-US",
      "de-DE"
    ])

    # The name of the scheme which contains the UI Tests
    # scheme "SchemeName"

    # Where should the resulting screenshots be stored?
    # output_directory "./screenshots"

    # clear_previous_screenshots true # remove the '#' to clear all previously generated screenshots before creating new ones

    # Choose which project/workspace to use
    # project "./Project.xcodeproj"
    # workspace "./Project.xcworkspace"

    # For more information about all available options run
    # fastlane action snapshot
와 대박 신기~ 스냅샷 뽑기가 완료되었습니다
성공여부를 이렇게 이쁘게 뽑아주다니,, 갬덩갬덩, 개발자의 소소한 행복이지요
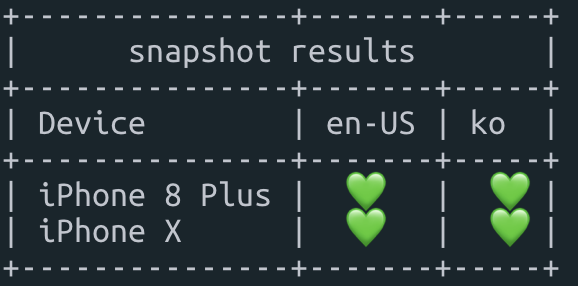
스냅샷 출력이 완료되면 html로 된 웹 페이지를 보여주고, 언어별/스크린별 화면을 비교하여 볼 수도 있습니다.
프로젝트 폴더 위치는 따로 지정할 수도 있고. 저는 프로젝트 폴더에 screenshots 폴더에 저장되도록 설정했습니다 (아마 기본이 이런 식 일 거 같아요)

처음 snapshot을 실행하면 아마 화면 전체를 뽑아오는 거 같아요!
미리 가져올 디바이스만 적용해주면 좀 더 빠르게 테스트가 가능할 것입니다 :)
전 이렇게 적용했어요!
    # A list of devices you want to take the screenshots from
    devices([
      "iPhone 8 Plus",
      "iPhone X",
    ])

    languages([
      "en-US",
      "ko"
    ])

    # The name of the scheme which contains the UI Tests
    # scheme("SchemeName")

    project "./FastlaneTest.xcodeproj"

    # Where should the resulting screenshots be stored?
    output_directory("./screenshots")

    # remove the '#' to clear all previously generated screenshots before creating new ones
    clear_previous_screenshots(true)

    # Arguments to pass to the app on launch. See https://docs.fastlane.tools/actions/snapshot/#launch-arguments
    # launch_arguments(["-favColor red"])

    # For more information about all available options run
    # fastlane action snapshot
Fastlane - Screenshots 끝!
'Programming > iOS' 카테고리의 다른 글
| Fastlane 으로 iOS 배포를 쉽게 하자! - Fastlane with Slack (0) | 2019.10.27 |
|---|---|
| Fastlane 으로 iOS 배포를 쉽게 하자! - Beta Deployment (2) | 2019.10.21 |
| Fastlane 으로 iOS 배포를 쉽게 하자! - Fastlane 이란? (0) | 2019.10.13 |
| [Swift] Swift Accessibility (접근성) - VoiceOver (0) | 2019.07.13 |
| [Swift] AutoLayout 톺아보기 (0) | 2019.07.12 |